


In this article, we will guide you through the whole process of activating your Chingari Wallet, completing your KYC and getting you started on using it. The process to activate your wallet and complete the KYC is simple and easy, so you will have no problems doing so. Follow the steps below to learn how to activate your wallet without hassle! Before that –
What is Chingari Wallet
Chingari Wallet is a digital payment wallet that is linked directly to your Crypto Wallet account (Like Phantom – A friendly Solana wallet built for DeFi & NFTs). To use it, you’ll need to do KYC—which means verifying your identity, address, phone number, etc. Here’s what you need to know about activating your Chingari wallet for $GARI Tokens. For step-by-step instructions on how to activate your Chingari wallet & KYC, read more.
Download the App (For A New User)
Before you can use your wallet, you must download the official app (available for Android) from Google Play/(available for iOS) from iCloud. Once downloaded, open up Chingari, tap Sign Up at the bottom of the screen then tap Sign Up with Email and Mobile number. Follow the steps: enter your email address, create a password, confirm the password and check your inbox for the verification code sent by Chingari App. Enter the verification code in the box at the bottom of the screen. Tap Create New Account once verified and you’re done. Congratulations!
 |
The Pros:
Activating your Chingari wallet is easy. You just need to activate your Wallet and get KYC verification done. It takes hardly 5 mins for KYC verification, and within a few minutes, you’ll be able to use your Chingari wallet. You can activate your wallet on iOS or Android by logging in with your email ID and activating through a one-time password that will be sent to you in SMS. If you have any problems, our customer care team will help you out!
Things You will Need:
To activate your Chingari wallet, you will need an Aadhar linked with your mobile number, a 12-digit Aadhar number, and a PAN card. Get all of these details ready before starting. Then follow these steps: Fill in your Aadhar number (12 digits) and submit it. Next, fill in your PAN Card Number (11 digits) and submit it.
Follow these Steps to Activate Chingari Wallet and Complete your KYC:
Step 1. Click on the Chingari wallet
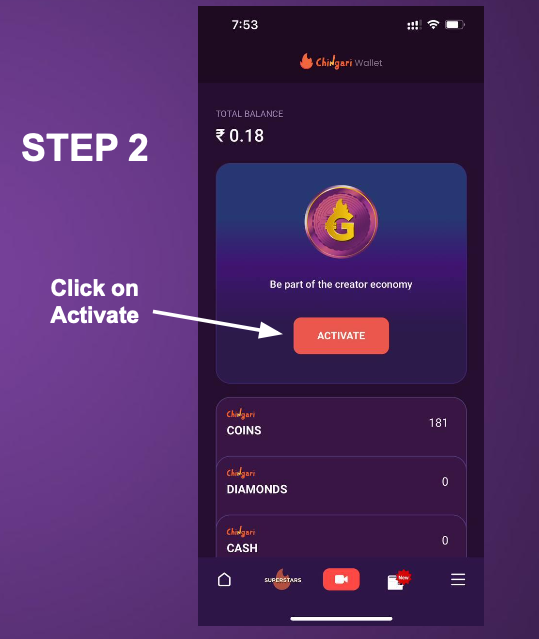
On your App dashboard, click on Chingari Wallet. On the next screen, you will see Activate your wallet button.

Step 2. Click on activate
Step 3. Click on the set pin

Step 4. Set the 6-digit Secure Pin
Once you’ve activated your wallet, follow in to set your 6-digit secure pin. You will not be able to use your wallet until you have set your security pin. To do so, enter a 6-digit number using both numbers and alphabets on each keypad (e.g., ABC12345) into the fields provided then re-enter that same 6-digit number one more time on each keypad. Next, tap Set Pin. Please keep your pin safe and do not forget, as there is no way to recover the pin.

Step 5. Set 3 security questions to secure your account and save answers
We provide 3 security questions to avoid compromising your account. These questions should be relatively easy for you to answer but not easily answered by a stranger who knows you or may have access to your crypto wallet account. Examples of these questions are, What is your mother’s maiden name? or What was your first car? You can also add another security question related to one of your social media profiles as a backup option if you ever forget your login credentials.

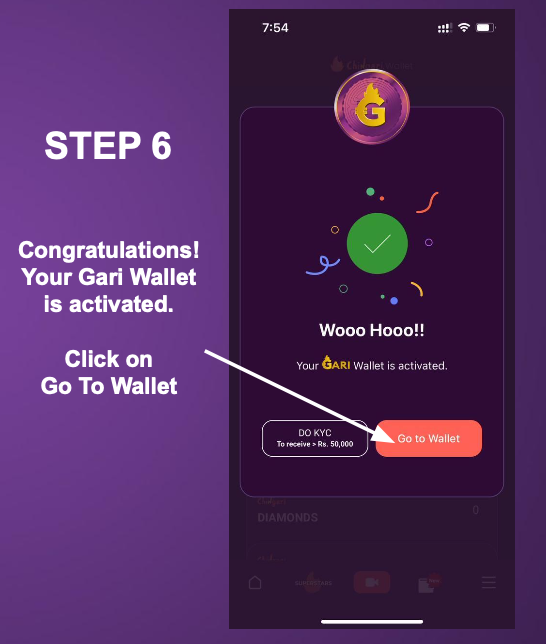
Step 6. Congratulations your GARI wallet is activated. Click on go to Wallet
Once you have completed the Wallet activation process you will see a screen that says your details are successfully verified and your wallet is activated. Click on the Go to Wallet option. It will open up another slide for Finishing KYC.
Step 7. Click on Finish KYC
You can start using your wallet after getting KYC verified. Once you activate your wallet, go to activate your account by clicking on ‘Finish KYC’. After that, follow the on-screen instructions. Once done, you are ready to use your wallet.

Step 8. Click on Continue

Step 9. Enter your valid phone number to start the KYC process then click on send OTP

Step 10. Add your Aadhar card number to link your Digi locker account with Signzy.

{Signzy – Chingari uses this platform for the KYC verification process. To know more about Signzy }
click here
Step 11. Check and confirm your Aadhar details and click on continue.

Step 12. Enter your name mentioned in the PAN card and PAN number and click on continue.

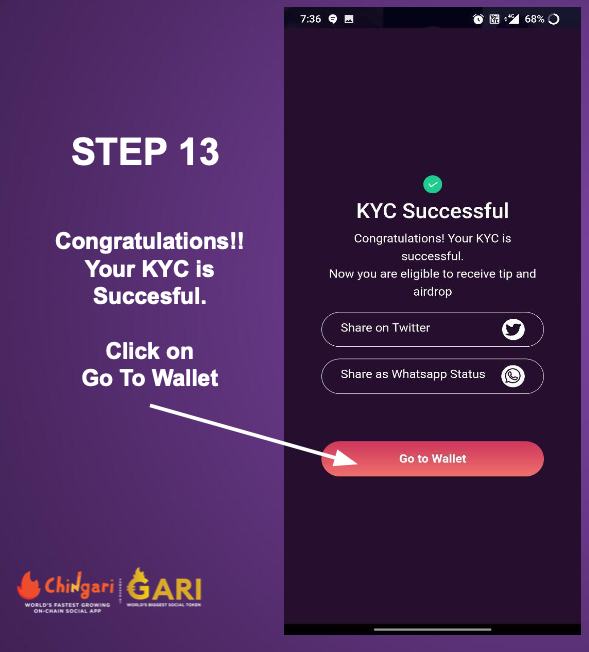
Step 13. Congratulations! Your KYC is Successful. Click on the go-to wallet
Step 14. Click on Claim Now

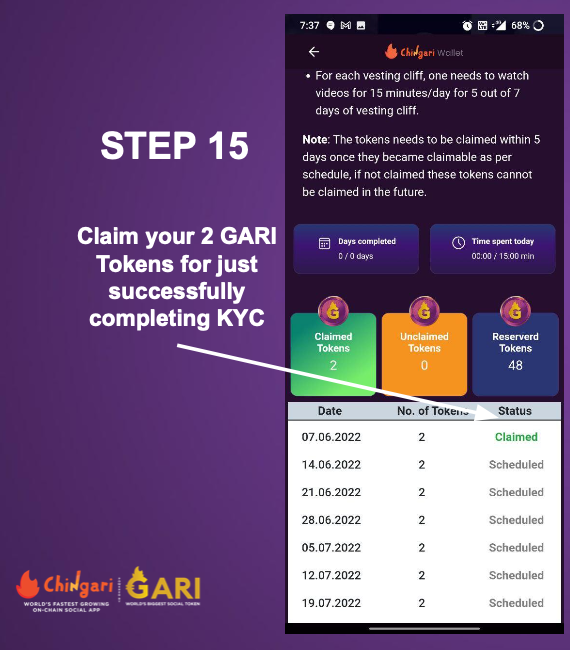
Step 15. Claim your 2 GARI Tokens for just completing your KYC
Step 16. Congratulations! You have received 2 GARI Tokens.

So, this is how you can activate your Chingari wallet and complete the KYC. If you need further assistance please contact our support team in case of any questions/queries/suggestions at help@chingari.io / +918037777000 .
Our GARI mining is LIVE now. Complete your Chingari wallet activation and KYC process and start mining.
 GARI price jumps 36% as Chingari announces mining program to reward creators, viewers
 Chingari celebrates World Bicycle and Environment Day with its 150+ creators across India